BEEP BEEP BEEP BEEP…
I hate waking up to an alarm clock. Especially on cold, dark winter mornings. My wife and I want to bike to work around dawn (so we can leave work and ride home before dark) which means we have to get up while it is still dark outside. This is painful with a regular alarm, but we’ve been experimenting with a prototype sunrise alarm built with an Arudino.
I’ve noticed that in the spring, when sunrise is getting earlier, it becomes easier to wake up before the alarm goes off. This feels wonderful: instead of feeling groggy, I feel rested and sometimes even energetic. In the fall, though, the trend reverses and it gets harder to wake up as it gets darker each morning. The sunrise alarm counteracts this trend by simulating an early sunrise, making sure the room is bright when it is time to wake up. This prompts the body to wake up naturally, rather than shocking it awake with loud noises.
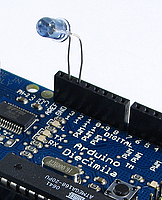
The hardware for our prototype alarm is simple: I have a Lutron Maestro wireless light dimmer, and the Arudino is controlling it with a single IR LED. (You can read more about how to use the Arudino as a remote control in this post). The nice thing about controlling the dimmer wirelessly is that everything is 5 volts, and I don’t have to worry about 120 volt shocks.
The software uses the remote control signal code described in the earlier post and combines it with the example from the Arduino DateTime library. The DateTime example has code for setting the clock on the Arudino over USB. I extended the code to set the current time and also set the time for the alarm to go off. The Arduino waits for the alarm time to arrive, then starts sending commands to the light dimmer to slowly turn on the lights. Right now I have it turn them on over the course of 20 minutes.
 At the moment this is just a prototype. I’ve been pretty happy with it so far, so at some point I’ll probably rebuild it using a bare AVR chip (so that I can use the Arudino for other projects). Here are some of the things I’ve noticed so far from using it:
- Using the regular lights in our room guarantees that it is bright enough to wake us up. It is a little too bright, actually. I might put lower-wattage bulbs in.
- I originally had it turn the lights on over 15 minutes. However, that felt too sudden. I kept waking up when it was already pretty bright. I slowed it down to take 20 minutes total; it ramps up to half brightness over the first 15 minutes then up to full brightness in the last 5 minutes. This seems to be more gentle. It might be worth experimenting with even longer periods of time, like 30 minutes.
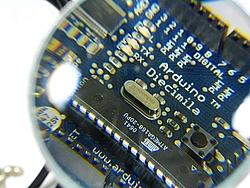
- The Arudino Diecimila resets when it is connected or disconnected from USB, losing the time. However, if you just yank the USB cable it won’t reset. This is nice because otherwise I’d have to leave my laptop turned on all night just so the Arudino wouldn’t lose the time. Leave the IDE running and connected to the Arduino, then unplug the cable without disconnecting in software. You’ll need to have the Arduino powered from a dedicated power supply so there’s still power after the USB is unplugged.
- I originally had it run once and then stop, but that meant I had to set the alarm again every day which was a hassle. I changed it to automatically move the alarm time forward 24 hours, which is much more convenient (but also risky…if I forget and leave it running when we go on a trip, it will turn the lights on and leave them on).
- Bugs in this type of device are annoying. If you make a coding mistake, it might turn the lights on in the middle of the night, or turn them on and leave them on all day. It might also fail to work at all, letting you oversleep.
We’re still setting our regular alarm to go off a few minutes after the lights reach full brightness, just in case we don’t wake up. (I may add a speaker to the finished alarm to consolidate this). Most days I’m already awake or just lightly dozing when it goes the regular alarm goes off, which is good. It feels much more civilized than getting dragged out of bed in the dark by that awful beeping.
The latest installment of Naru (an island economy game) joins the economy simulation and the island maps. Now when you create an island, it will have the economy engine I wrote about earlier running behind the scenes. This means that cities can trade with each other if you connect them with roads. By clicking on the city names, you can control the production levels of the cities and see graphs of population trends in the city.
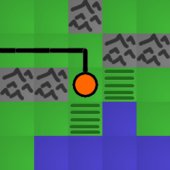
I also improved a few issues in the UI. The squares of the map are now shaded slightly, making it easier to click the square you intended to. Also, cities will automatically connect to roads now; you don’t have to build both a city and a road on the same square.

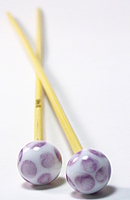
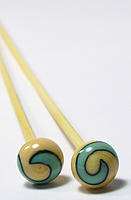
I previously mentioned yanaknits.com, a site started by my wife to teach people how to knit. She’s written instructions for all kinds of knitting projects, from a scarf and mittens to a soccer ball. Now she is collaborating with a friend to create hand-crafted knitting needles. They are bamboo needles with beautiful glass tops, lovingly packaged, and would make really wonderful gifts for anyone who enjoys knitting.
The glass tops come from Andru Anderson’s Kodiak Glass. Andru has been working with glass for about 8 years now, learning different styles and techniques and creating glass jewelry and art. He does a lot of torch work to create glass beads and small sculpture. He has also taught classes at the Bay Area Glass Institute. The small glass beads he created for the needles are gorgeous and unique.
Check out the store here!
New Designs!
If you’re interested in the G-4 glider, you might also like some of my newer
designs.


See newer designs
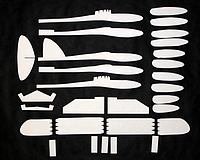
G-4
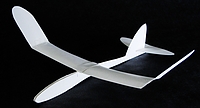
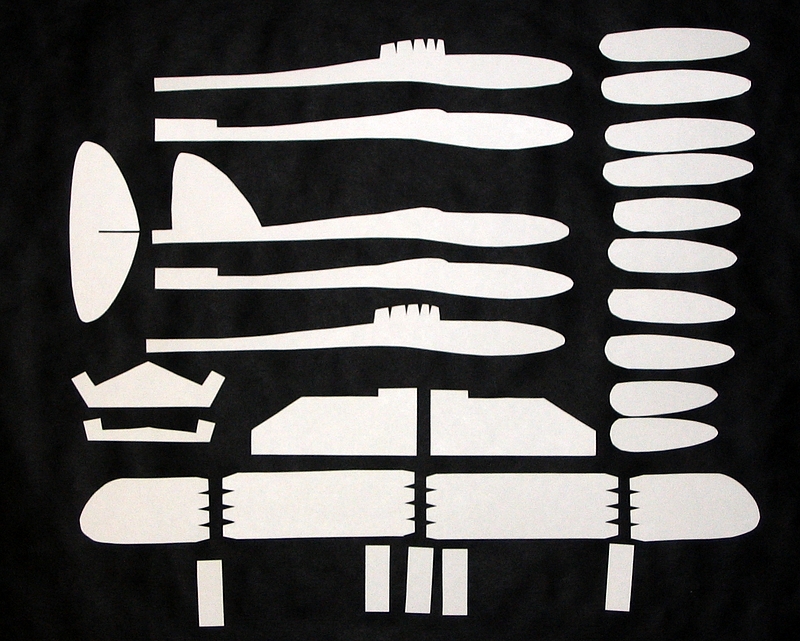
Here are plans for a laminated paper airplane: the G-4 glider.
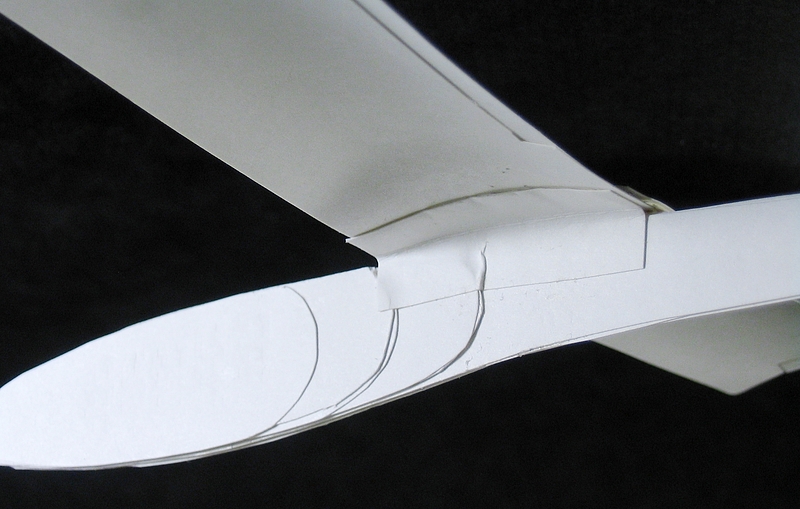
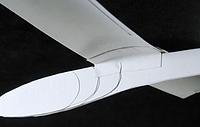
If you haven’t built one of these before, I would suggest that you start with the simpler G-1 glider. It has simpler wings which are easier to assemble. Also, that page explains some construction tips that I won’t bother to repeat here. After you’ve build a G-1, the G-4 will be very similar. The main difference is longer wings with small winglets at the end.
You don’t necessarily have to stick to the plans. If you want to experiment, here are some simple modifications you might try:
- Try lowering the angle of the wing tips to see if you get better performance. The plans call for 25 degrees at the wing tips, but I think that might be too aggressive. Try a smaller angle and see if the plane flies farther.
- You can get a plane without any markings on it by printing the plans out on a separate piece of normal paper (not the thick card stock). Then tape the plans to the card stock and cut out the pieces. You’ll end up with clean pieces, with no lines on them, which I find aestheically pleasing.
- If you shrink the plans before you print them, you can make smaller planes. You could try to make larger planes too, but I suspect the paper wouldn’t be strong enough.
Once you’ve built a plane, find a large outdoor area to fly it, because these planes can fly a long way. Even in a decent-sized yard it often goes over the fence into the neighbor’s yard. An empty softball field works well. Check here for tips on tuning and flying your plane.
 Download G-4 plans (rev. 2):
It is really easy to build a universal remote using an Arduino. With just an infrared LED, it can impersonate remotes for your TV, fans, lights, etc. and can let you easily incorporate these into your electronics projects. You won’t even have to solder anything or void any warranties.
For a project I’m working on, I need to emulate the remote for a Lutron Maestro light dimmer. It uses a modulated IR signal, which is a common way for remotes to communicate and is easy to generate with an Arduino. The basic scheme is simple: each command is sent as a series of pulses representing bits, which can be either 1 or 0. To send a 1, you rapidly blink the LED on and off at 38 kHz, and for 0 you leave the LED off. (The 38 kHz modulation makes the signal more resistant to interference from other light sources).
Decoding the Signal
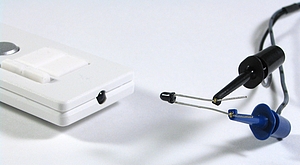
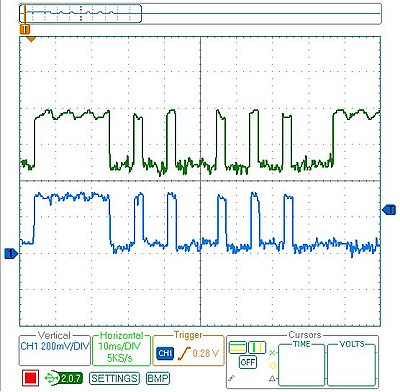
To decode what the remote was sending, I used an oscilloscope and a small photodiode. The photodiode generates a small amount of voltage when light hits it, and responds to changes in light level quickly enough that the oscilloscope can draw a really nice plot of the signal. I have a Parallax USB oscilloscope, which is perfect for showing the command pulses and is just fast enough to find the modulation frequency. As an aside, I’m really happy with the Parallax oscilloscope for projects like this. It is simple to use and I love being able to save images to share with people.
Here’s what two of the commands from the dimmer remote look like. The top signal is the “fade lights up” command, and the bottom one is “fade lights down”:

I captured several different commands, then measured the length of all the pulses. Looking at all the commands, a couple patterns are obvious:
- The entire command takes 82.8 ms (after which it immediately repeats, presumably because I held the button on the remote down a little too long).
- The lengths of the on/off pulses are all multiples of 2.3 milliseconds (which means that the entire 82.8 ms command represents 36 bits of data).
- The last four bits are always 0, so really each command is four bytes long, followed by four 0 bits
The particular remote I’m emulating has five commands, and once they are decoded they look like this:
fade up        = [255, 136, 130, 34]
fade down      = [255, 136, 130, 20]
full on        = [255, 136, 132, 184]
full off       = [255, 136, 189, 18]
memory recall  = [255, 136, 132, 183]
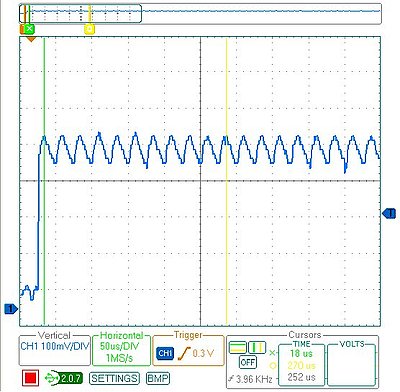
The one other missing piece of information is the modulation frequency which can be measured by zooming in on any of the pulses. This remote uses a frequency of 39.68 kHz. (In the plot below, it says the frequency is 3.96 kHz because I included 10 pulses in the measurement to increase accuracy)
Programming the Arduino
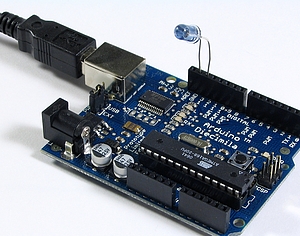
Using an Arduino makes the circuit really simple. I put an IR LED between pin 13 and ground. Since pin 13 has an internal resistor, that’s all that’s required. The code is also pretty straightforward:
/* Control a Lutron Maestro light dimmer */
#define BIT_IS_SET(i, bits)  (1 << i & bits)

// LED connected to digital pin 13
const int LED_PIN = 13;
// Width of a pulse, in microseconds
const int PULSE_WIDTH = 2300;
// # of bytes per command
const int COMMAND_LENGTH = 4;

const int UP[]     = {255, 136, 130, 34};
const int DOWN[]   = {255, 136, 130, 20};
const int ON[]     = {255, 136, 132, 184};
const int OFF[]    = {255, 136, 189, 18};
const int RECALL[] = {255, 136, 132, 183};

void setup()
{
  pinMode(LED_PIN, OUTPUT);
}

/* Modulate pin at 39 kHz for give number of microseconds */
void on(int pin, int time) {
  static const int period = 25;
  // found wait_time by measuring with oscilloscope
  static const int wait_time = 9;

  for (time = time/period; time > 0; time--) {
    digitalWrite(pin, HIGH);
    delayMicroseconds(wait_time);
    digitalWrite(pin, LOW);
    delayMicroseconds(wait_time);
  }
}

/* Leave pin off for time (given in microseconds) */
void off(int pin, int time) {
  digitalWrite(pin, LOW);
  delayMicroseconds(time);
}

/* Send a byte over the IR LED */
void send_byte(int bits) {
  for (int i = 7; i >= 0; i--)
  {
    if (BIT_IS_SET(i, bits)) {
      on(LED_PIN, PULSE_WIDTH);
    } else {
      off(LED_PIN, PULSE_WIDTH);
    }
  }
}

/* Send a full command */
void command(const int bytes[]) {
  for (int i = 0; i < COMMAND_LENGTH; i++) {
    send_byte(bytes[i]);
  }
  off(LED_PIN, 4 * PULSE_WIDTH);
}

void loop()
{
  command(UP);
  delay(1000);
  command(DOWN);
  delay(1000);
}
Checking the Arduino with the Oscilloscope
After programming the Arduino, I used the oscilloscope to check the output of the Arduino vs. the original remote. On my first attempt, the wait_time in on() was too long, so the command was stretched out. I hadn’t accounted for the fact that the digitalWrite() calls would consume some time, so I just decreased wait_time until the length of the overall command was correct. As you can see, the final synthesized command overlaps exactly with the authentic one. The green signal on top is from the remote, and the blue signal on the bottom is the arduino:
Final Test
Once everything was ready to go, it was time for the last test: I tried using the Arduino in place of the remote and it worked! It was able to control the light dimmer flawlessly. This lets me finish my project, plus now that I have all the code written it should be easy to adapt to other remote control devices.
Normally there are all kinds of aspects to a simulation that are driven by mathematical functions, like gravity, momentum, population growth rates, economic trends, etc. However, mathematical functions can be difficult to tweak, and I’m finding it much easier to use lookup tables instead. This makes it much easier to make slight modifications: rather than adding additional terms to a function, I just have to modify the values in a table.
I wrapped up the logic for storing a table of points and providing interpolated values between those points into a Python class. Using Python’s __getitem__ method lets my object behave like an array, so I can just index into it when I need a value. Here’s the class:
class InterpolatedArray(object):

  """An array-like object that provides
  interpolated values between set points."""

  def __init__(self, points):
    self.points = sorted(points)

  def __getitem__(self, x):
    if x < self.points[0][0] or x > self.points[-1][0]:
      raise ValueError
    lower_point, upper_point = self._GetBoundingPoints(x)
    return self._Interpolate(x, lower_point, upper_point)

  def _GetBoundingPoints(self, x):
    """Get the lower/upper points that bound x."""
    lower_point = None
    upper_point = self.points[0]
    for point  in self.points[1:]:
      lower_point = upper_point
      upper_point = point
      if x <= upper_point[0]:
        break
    return lower_point, upper_point

  def _Interpolate(self, x, lower_point, upper_point):
    """Interpolate a Y value for x given lower & upper
    bounding points."""
    slope = (float(upper_point[1] - lower_point[1]) /
             (upper_point[0] - lower_point[0]))
    return lower_point[1] + (slope * (x - lower_point[0]))
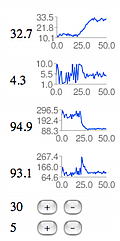
You use it like this:
points = ((1, 0), (5, 10), (10, 0))
table = InterpolatedArray(points)
print table[1]
print table[3.2]
print table[7]
Here are some examples of the kinds of curves you can easily make:

points = [(0, 0), (2, 9.5), (4, 8.5), (6, 4), (8, 1), (10, 0)]

points = [(0, 10), (2, 10), (4, 9), (6, 7), (8, 4), (10, 0)]

points = [(0, 0), (2, 0), (4, 1.5), (6, 8.5), (8, 10), (10, 10)]
Feel free to use this in your own projects.
 After prototyping the basic map editor, I’ve switched to working on the backend of Naru recently. Specifically, I’ve been working on the simulation of the island’s economy, which is going to be the meat of the game.
My approach has been to create a dashboard that exposes the interesting stats and graphs them over time. I’m trying to make it easy to visualize what happens when I tweak the various values. I’ve found the graphs to be really helpful in illustrating how trends work their way through the system. I can do something like connect two cities (so they can trade), then run through several turns watching how the populations grow & shrink until they hit a new steady state.
I think I have the simulation to a point where it is starting to be convincing. The population of each city depends on whether the citizens are happy, which in turn depends on whether their needs are met. For example, if they don’t have enough food, they will be unhappy and will eventually move away. If they have an abundance of food, they will be very happy and more people will move in to the city. At the moment I only have 2 resources in the simulation: food and raw materials (which could some day be turned into manufactured goods in a factory). Cities can be connected by roads, in which case surpluses can be distributed to other cities. This means that the total population of the island should increase as more towns become connected (because the surpluses won’t be wasted). The only control the player has is over the amount of resources produced by each city and the road connections between cities.
If you want to play with the simulator, you can get started by going to http://naru.countlessprojects.com/island/economy
I’m pretty sure there are still lots of bugs in it. I haven’t written tests for most of the code because it is still very much a prototype. Still, any feedback you have would definitely be appreciated.
This post is about being productive. It is also about drawing charts, Google App Engine, and monkeys. But mostly about being productive.
For a couple years now I’ve been running a project night. Once a week, myself and a few friends get together to work on whatever projects we’re currently involved with. The goal is to sit down and get stuff done, in the company of other productive people.
Last week, a friend and I decided to collaborate on a service for recording and charting measurements. The basic problem we’d be solving: “I want to measure some property X every N seconds and then draw a chart of the data.” The service would take care of aggregating the data and drawing charts. The user of the service would just have to write a client to periodically report measurements.
We set ourselves a challenge: try to finish a (very) rough end-to-end prototype in 2.5 hours. It would have a simple API for reporting new data points, a web page where you could view the charts, and one example client. Here’s what we managed to get done:
The whole things is done using Django on Google App Engine. There’s a simple REST API for posting new measurements, and a simple web interface for viewing the charts (which are drawn using Google Chart API).
Some observations from the project:
Picking a name is hard. Unless you’re in a hurry, in which case it becomes easy: you just pick the first name someone shouts out that isn’t taken. Stats Monkey was the first name that passed this test for us.
Having two people sitting next to each other made it much easier to stay in scope. When one of us was about to waste time over-doing something or going off on a tangent, the other one would step in. I don’t think we would have finished the project if we hadn’t been sitting next to each other announcing what we were about to do.
We both already had a lot of experience with all the tools we were using. This really helped, because there was basically no setup time. Google Code and App Engine both have really low startup costs for a project like this. I think maybe only 10-15 minutes were spent getting a subversion repository and hosting.
We hit a lot of SVN conflicts. We also had trouble with incomplete syncs/commits because we were both used to p4 semantics (where a commit includes files from the entire workspace, not just the current directory). It would be worth trying to mitigate this if we try something like this again.
The code is full of bugs and security holes, and doesn’t have any tests. Since we just barely made our deadline, I don’t think this was a mistake. We didn’t hit any major roadblocks, but this was probably just luck.
I’ve finished a first pass at building cities on an island. You can create a new island* and then start building on it. You can start cities, build roads, and irrigate bare land to create fields. There’s also a terraforming menu, so you can flatten mountains and fill in the ocean if you want. Terraforming won’t be there in the finished game, but makes it easier to play around with different island shapes at this stage. Some of the basic building logic is implemented (so you can’t build a road across mountains, you can’t build a city in the water, etc.)
The interface is…simple. It is the simplest interface that could just barely be construed as working. I’ll definitely be spending more time on this, but I want to get the core of the game working first.
As I hinted at in my last post, I’m writing this game in 2 distinct parts:
1) A library which implements a simple island economy game
2) A django app which puts a nice user interface on this library
By implementing my core game logic as pure (non-django-related) python, I have a bit more freedom writing tests and experimenting. I’m just writing normal tests using the unittest module. I’ve started on a basic economy, and so I have a couple command-line programs that let me poke around at different parameters trying to get something reasonably stable and convincing.
The live version is running at http://naru.countlessprojects.com. If you try it out, I’d appreciate any comments, questions, or feedback you might have.
* For now, I’m requiring sign-ins using google accounts. This was the fastest way for me to make sure no one else can edit your maps. I definitely want to allow instant, no-sign-in play later, but right now there are much bigger features to tackle.

I’m finally launching a project I’ve been working with off and on for the past year: a photographer’s guide to Point Reyes National Seashore. I’ve been taking photos at Point Reyes for several years now and it is one of my favorite places for landscape photography in the Bay Area. Since I couldn’t find any resources that talk about taking photos there, I decided to start one. I have 3 goals with this project:
- Help people take better pictures at Point Reyes.
- Give myself an excuse to go there more often to do research for the website.
- Improve my writing through practice.
Now, for some technical details about the site. It is built using WordPress. Although primarily blogging software, WordPress also has a limited ability to write static pages. This is intended for things like an “About” page, but also can be pressed into service to make an entire static (i.e. non-blog) site. The blog features of WordPress, which are perfect for a “News/Announcements” page, can be bumped off the front page of the site to a dedicated news section. Since I’m already using WordPress for zovirl.com, it is convenient to be using the same software for pointreyesphotoguide.com.

WordPress has some good image upload features, and it generates thumbnails for you too. However, I want more control over both the image resizing and the final URLs of the images, so I’m using a Makefile and ImageMagick to automate the image generation. The original images are organized in a directory structure which mirrors the final URL structure I want. These are much larger than practical for a web page, so ImageMagick is used to shrink them down to the full size & thumbnail images. I apply a slight sharpen after the resize to avoid post-resize blurriness. Having automated this process, it was easy to try different images sizes because I just had to tweak a parameter in the Makefile and run ‘make’ again.
Photographer’s Guide to Point Reyes