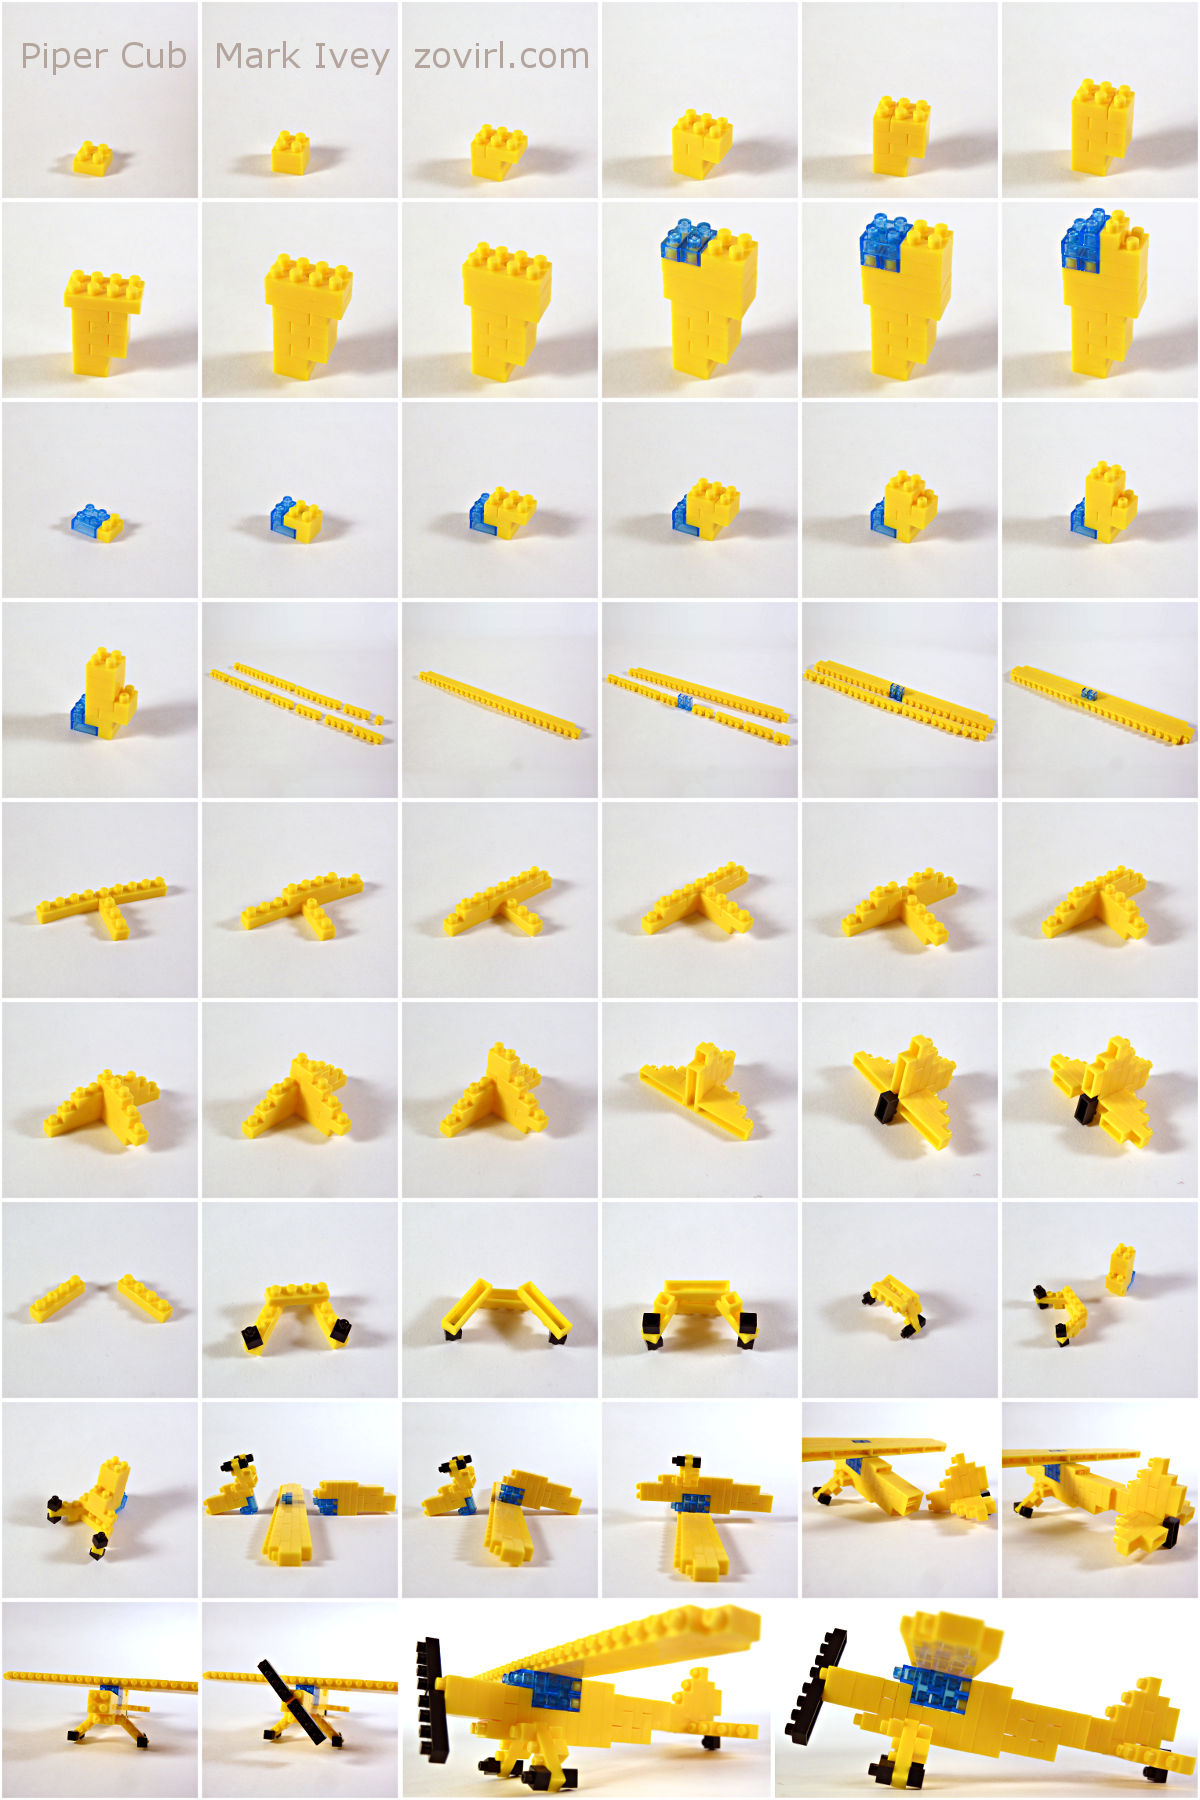
Here are instructions for building a model of a Piper Cub airplane from Nanoblocks.
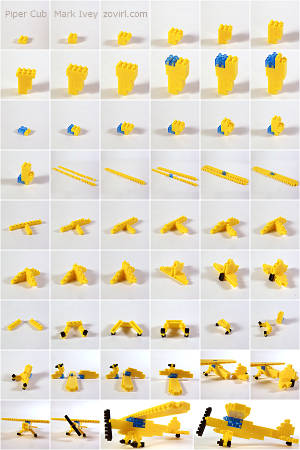
The Cub is a small 2-seat plane that's been around since 1938. Top speed of the original model was 85mph, though later models increased the size of the engine and got the top speed up to 130 for the Super Cub. The body of the plane is incredibly narrow, with one seat in front of the other instead of having the seats side-by-side. The instrument panel on early cubs was incredibly simple: RPM, airspeed, compass, altimeter, oil temperature & pressure, and slip indicator. That's it.
I designed the nanoblock model starting with the wing. The only way to get the wing skinny enough is to build it with the studs facing forward. Studs forward is also useful for attaching the propeller and getting the landing gear at the correct angle, so the whole plane is done with the studs forward instead of up. The size of the model was decided by the number of yellow bricks I had.
Hope you enjoy building it!
When I first started playing Triple Town I was annoyed that I kept running out of turns. It felt like the kind of dirty trick a Facebook game would play. Actually, I just wasn't good at the game. It is possible to earn enough coins from each game to pay for your next game. It also makes the game more fun: instead of bears being troublesome creatures messing up your high score, they are profitable resources to be exploited.
Ironically, now that I don't need unlimited turns I bought them anyway because I want the other game modes.
The economics
- Turns cost between 0 and 4.75 coins/turn, depending on how much play per day (because you get 150 free turns per day). Example: 150 free turns plus buying turns twice: 550 turns for 1900 coins, or 3.45 coins/turn.
- You get paid 1 coin per turn (at the end of the game). You also get paid based on your city's rank, but I'm not sure what the formula is so I don't worry about it.
- Mansions pay 100 coins each (at end of game). Castles pay 200 coins, but require 3 mansions, so it is better to just keep the mansions.
- Treasure chests pay 500 coins.
For the example 550 turn game, you need to make 1900 coins total. You'll get 550 coins (#2 above). If you can get 3 treasure chests, you made a small profit. Or if you get 2 treasure chests and 4 mansions, you also come out ahead.
Further Nuances
- It takes 27 bears to get a treasure chest (bears -> churches -> cathedrals -> treasure), so a correctly-placed bear is worth 18.5 coins.
- A crystal used to combine two cathedrals to get a treasure chest is worth 167 coins (1/3rd of 500)
- A crystal used to combine two houses to get a mansion is worth 33 coins (1/3rd of 100)
- Using crystals & robots to make rocks -> big rocks -> treasure chest requires 7 crystals and 1 robot. 71 coins per crystal. You're better off using crystals to combine cathedrals, except...
- At the start of the game you get lots of crystals and sometimes start with a couple rocks. If you get crystals before you have anything useful to combine, the rock -> treasure route is reasonable. This can be a quick way to pick up 500 coins at the start of a game.
- All those crystals at the start of the game also mean the early game is more profitable. Once the crystals stop coming and the map is filling up with ninja bears, it is time to scrap the city and start a new one.
(I play the Android version of Triple Town. I don't know if the iOS, web, or kindle versions have different economics, but you could do the same analysis).
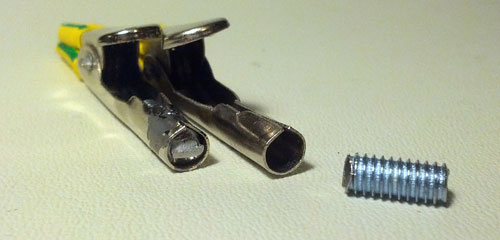
When soldering electronic parts together, one hand holds the soldering iron and one hand feeds the solder, leaving no hands to hold the parts being soldered. There's a common tool nicknamed a third hand which helps here. The tool has one or two (or three) adjustable alligator clips to hold parts and usually has a magnifying glass to help see the work.

Mine was always a little difficult to use. The clips would fall out of their holders, and the teeth on the clips tended to bite through insulation on wires. I lived with this for years without thinking much about it, but finally fixed it. It took 10 minutes. I should have fixed it years ago.
First, following this advice from Robot Room, I strengthened the base of the clips so they wouldn't fall out. The problem is that there's a screw which clamps down on a flimsy, hollow tube and can easily crush the tube. Solution: fill the hollow tube with metal so it can't be crushed. The article suggested using a brass rod, but I didn't have that so instead I found a bolt which fit, cut it to the right length, and screwed it in.
Second, I put two layers of heatshrink over the teeth so they aren't as sharp. Should help protect wires.
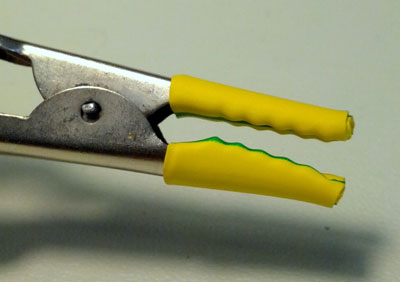
These were both easy fixes. If you have one of these third hand tools, you should take 10 minutes and fix it up!
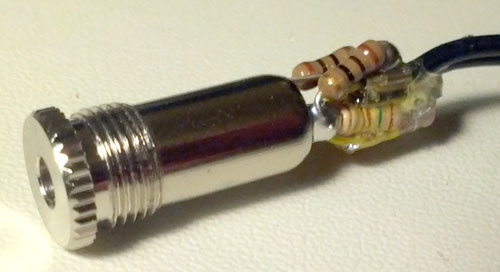
My headphones are too loud. I have in-ear headphones which seal out outside noise and are quite sensitive. I have to keep the volume at its lowest setting, almost off, for comfortable listening. This has two drawbacks: it is painfully loud if the volume ends up at its max setting, and there's usually a hiss coming from my phone or laptop which competes with the music at the lowest volume setting.
To fix this, I made a short headphone cable which reduces the volume. This is similar to the headphones which have a volume knob or slider built into the cable, except that it only has one setting: quiet. The circuit is two simple voltage dividers, one for the left channel and one for the right channel. I found the resistor values through trial-and-error on a breadboard, just trying different values until I found some that gave the ideal volume reduction. The circuit is tiny enough to fit inside the headphone jack and it works well. I can now comfortably use the entire volume range when listening to music, and at the higher volume settings the hiss is drowned out by the music so I can't hear it any longer.

I've been learning WebGL and have been confused how alpha blending works.
Coming from working with the 2D <canvas> API, the WebGL behavior was was
surprising to me.
(This post uses some recent HTML5 features which won't show up properly in
older browsers or IE. I know Chome and Firefox will show it correctly).
The Problem
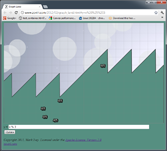
The demo below uses WebGL to draw white, gray, and black triangles in a
range of alpha values, all with the standard gl.BlendFunc(gl.SRC_ALPHA,
gl.ONE_MINUS_SRC_ALPHA). The results are weird. For example, why does the
row of black triangles get lighter than the background as alpha
decreases? If you change the background to be almost-but-not-quite
white, why do the white triangles stop fading entirely?
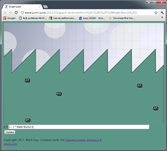
For reference, here's a version done using the canvas API
which behaves as expected and clearly shows the differences in alpha behavior
between canvas and WebGL:
The Answer
As I learned from
Gregg Tavares,
the answer to the puzzle is that WebGL blends the alpha channel differently than
canvas does. Using the standard gl.BlendFunc(gl.SRC_ALPHA,
gl.ONE_MINUS_SRC_ALPHA), WebGL's blending equation for alpha is:
A = Asrc * Asrc + Adest * (1 - Asrc)
If you start with an opaque buffer and render a
semi-transparent polygon, the result is that the buffer is now
semi-transparent (A = .5 * .5 + 1 * (1 - .5) = .75).
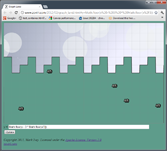
This transparency allows the white background of the page to show through and
blend with the WebGL colors. Putting text behind the WebGL canvas makes
this obvious:
Gregg details
several ways to address this, including using { alpha: false } when
requesting the context:
I gleaned some game marketing tips from several talks at GDC this year.
Tom Francis (Gunpoint) described how to explain games in writing,
while Kert Gartner showed how to make good trailers for games. The techniques
are quite similar since both require efficient communication. Taken together,
these two talks were filled with great advice for telling people about your
game. Also, Nathan Vella (Sword & Sworcery) explained how they used
consistent PR to communicate the spirit of their game to potential players.
How to Explain Your Game in Writing
Tom Francis talked about explaining a game to impatient readers. Keep the
explanation short, about 3 sentences, by means of ruthless editing. Do not
make these common mistakes, they waste words:
- Failing to explain things. Don't post a gameplay video with no commentary
and hope viewers understand. They won't.
- Explaining artistic intent. It doesn't explain why I would want to play
your game. It also uses too many words.
- Explaining story. A compelling explanation of your games story takes
too many words. Skip it.
- Saying it is "innovative" or "awesome." These words mean nothing coming
from the creator of the game.
Instead, you need to fit these 4 things in 3 sentences:
- Type of game. Just a few words. 2D platformer. Racing game with
RPG elements.
- Coolest unique thing. Rewind time to fix mistakes. Tear down and
rebuild the entire world.
- The fantasy. Not story, that takes too many words. Just the
fantasy: You're a criminal driving around a sprawling city. You're
searching for your sister in a creepy forest.
- Give one example of the gameplay. You fly your helicopter up the river
bed, staying behind the trees to avoid detection, then sneak over the ridge
to drop the commandos off at the enemy base. You drive your moped up the
stairs, through the shopping mall, then jump over the embankment to get
away.
Focusing on efficient communication makes it more likely you'll get your
point across before the reader loses interest. Tom has posted his talk here.
How to make a good trailer
Kert Gartner explained how to make good trailers for games. Similar to Tom's
points about terse writing, Kert stressed the importance of keeping the trailer
short.
Don't:
- Make it longer than 60-90 seconds. Most viewers won't watch that long
- Try to explain everything.
- Cram too much information in.
- List features of your game. This is boring and not a good use of
precious time.
- Release a bad trailer. You'd be better off with no trailer.
Do:
- Make sure the first 5-10 seconds capture attention.
- Use a simple dramatic story arc. A clear beginning/middle/end structure
which builds to a climax is good.
- Show what the game is about.
- Capture the style or feel of the game.
- Use zoom-in to focus on the important parts of busy/complex
gameplay footage.
- Use slow-motion to help the viewer catch important parts of fast gameplay
footage.
- Leave the viewer wanting more.
He showed several example trailers with a detailed explanation of the
techniques going into each
one. It would be worth going over to his blog to see the examples.
How to Keep Your PR Consistent
Nathan Vella talked about PR for Sword & Sworcery. I was impressed
by how much they focused on consistency and on getting the feel & spirit of
their game into their PR material.
Nathan had a couple tricks for making sure the vision for the game is
communicated in the PR. First, base the PR on the vision for the game
instead of the game itself. If you base the PR on the game, the vision will be
watered down. It is ok to reference the game, obviously, but make sure the PR is
being influenced by the vision. Second, make sure that the person who is in
charge of the vision for the game is involved in the PR directly. Ideally you
want your PR and your game to feel like part of the same whole. Example:
gameplay in Sworcery is tied to phases of the moon, and they kept this
same astronomical spirit by doing sales of the game around the solstice.
There was also the mechanical side of consistency: use the same fonts in your
game and your PR material. Use the same color palettes. Use the same sound
effects. Maintain a common voice between your game and your PR (and make sure
all your PR uses a common voice, especially if multiple people are involved in
producing it).
You can see some of this consistency in action over at the Sword & Sworcery website,
where they talk about "electric computers" and the soundtrack being available on
vinyl & audio cassette and where they label their search box "What do you
seek?". It feels like their website came from the same weird world that
Sworcery is set in.
I like the idea of approaching game development as an artisan baker would
approach making bread or the way a craftsman would approach making a piece of
fine furniture. Making unique, high-quality products for a discerning audience.
Artisan games.
There were a couple talks at GDC this year that reminded me about this,
especially Nathan Vella's talk on how they making Sword & Sworcery
stand out by taking taking risks, targeting a niche audience, and keeping
quality high.
Unique Games
Nathan started with the business reason for making a game which stands out:
There are so many games out there, it is easy for your game to blend into a sea
of similar games. Making a game which stands out is a big step towards
success. I also have a personal reason: I want to make something new, something
unique. Games take so much time to make that I don't want to be making games
that have already been done.
Making a game that doesn't stand out is straightforward: just follow
convention. Do what other games do. Each game platform has a set of common
trends that you can follow. Making a game for iOS? Use cartoon graphics, one or
two simple mechanics, and keep the game short. Making a Facebook game? Have an
energy mechanic to encourage players to return tomorrow, use asyncronous
multiplayer, and nudge the player to invite their friends. If you always take
the "safe" option when faced with a business choice, your game will probably
blend in. If you want to stand out, you're going to have to start breaking
conventions, ignoring trends, and taking risks. Nathan kept coming back to the
idea of taking risks throughout his talk.
Amir Rao (Bastion) spoke during the failure workshop and mentioned a
great safety net to use when making a risky game:
- Ask "What's been done?" Find the conventions.
- Do something else, something new.
- If #2 fails, fall back to the conventions you identified in #1.
Falling back to convention sounds like a great way to make progress if the
risky innovation doesn't pan out. On Bastion they ditched a gardening
mechanic that wasn't working but their game still stands out because they bucked
trends in other areas of the game. You don't have to innovate on every aspect of
your game to have it stand out. It is ok to stick to conventions in some areas.
Discerning Audience
Nathan specifically warned against trying to make a game with broad
appeal. Yes, the payoff is huge but there's also stiff competition. He compared
it to a lottery. Instead, Nathan suggested going after a niche. This lets you
target your game specifically to your audience. You will be able to know your
customers and know what they want. You're much more likely to stand out to your
customers because you're making a game just for them. You can tailor your
PR so you are speaking directly to your niche. Nathan pointed out that there
are enough game players now that niches can still be huge. They've sold
something like 350,000 copies of their niche game on iOS.
High Quality
The last part of artisan games: quality. Nathan said on Sworcery they
decided it was safer to slip their deadline and over-run their budget than to
release a rushed game that wasn't great. In the end, they found that finishing a
risky game well opened a lot of doors. This echoed what Kert Gartner said
in his talk on making trailers for games: a bad trailer is worse than no
trailer, so either make an awesome trailer or don't make a trailer at all.
This seems especially important if you're trying to build a reputation for
great games. The one caveat I would add is that it probably doesn't apply if
you are just starting out. New developers usually don't have the skills to
making high-quality games. That's normal. If you are new it is more important to
make lots of games than to get stuck trying to make your first game
high-quality. Quality will come with practice. Going back to the baker analogy,
no one expects a beginning baker to make a perfect loaf. If you have the skills
to release quality games, though, it seems like a sound choice to do so instead
of rushing crap out the door.
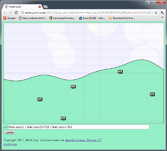
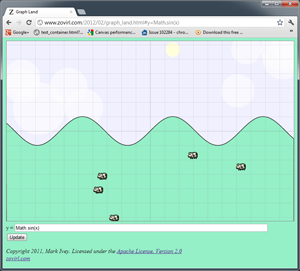
Graph Land is a graphing calculator for Javascript. In addition to such useful
features as the ability to plot Math.cos(Math.floor(x*2)), it
also has adorable cows, clouds, dusk, dawn, and other such fine accoutrements
which all fashionable graphing calculators in this modern age aspire toward.
Try it now
A brief account of the creation of Graph Land
A flight simulator I've been working on needed some interesting terrain for the
player to fly over. I saw two solutions: use a level editor to create some
interesting terrain (the manual route), or make an algorithm that generates
interesting terrain (the procedural route). Making levels by hand is tedious and
time-consuming, so I chose procedural terrain generation, which is also
time-consuming but more entertaining.
To get rapid feedback while working on the terrain I made a simple app that
plotted the output of the algorithm as I tweaked the parameters. It was
basically a graphing calculator that took a Javascript expression as input. I
used the app to get an algorithm capable of producing convincing hills and
mountains, then moved on to work on other things.
Later, I found myself coming back to this app to visualize other things. I used
it to tune the length of daytime/nighttime (a modified sine wave) in a different
game. Then I needed to smoothly switch colors in another app and I knew the
shape of the curve I wanted, but I didn't know what the actual formula was until
I messed around in the graphing app for a few minutes and found it.
Much later, cows wandered in. Shortly after that clouds formed in the sky.
Eventually the sun, showing no respect for the traditional order of creation by
its tardiness, started making a daily appearance.
I've found Graph Land useful. I'm publishing it so others can use it too. The
whole thing is licensed under the Apache 2 license, so feel free to reuse it in
other projects.
Appendix A
A collection of examples, most of which may be useful to game programmers:
Javascript's % operator (A) behaves like C not like Python,
which always frustrates me when x is negative. I usually end up
using (B) instead. Rounding down (C) gives a formula that converts any value of
x to a valid index into an array of length 3.
Smooth transitions can be down with a modified logistic function (D), which
is very easy to tweak ((A) gives a slow transition, (E) is much more abrupt). A
much faster but less flexible approach is 3x^2-2x^3 (F).
Sometimes you want abrupt transitions, not smooth transitions. (G) and (H) will
give you those.
Appendix B
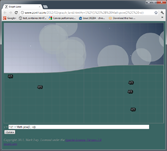
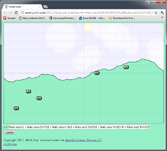
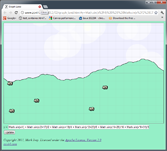
Convincing random terrain is largely a matter of mixing several frequencies
together.
If you use your imagination, you can pretend this is a hill even though it is
too smooth:
y = Math.sin(x/4)
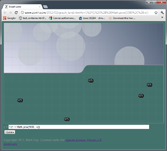
Adding in another higher-frequency, lower-amplitude sine wave makes a
subtle improvement:
y = Math.sin(x/4) + Math.sin(x/2+17)/2

(The "+17" bit offsets the second sine wave so both waves don't cross (0, 0)
together.)
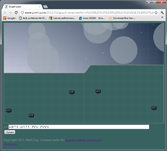
If you keep adding in higher-frequency, lower-amplitude waves you can see the
hill gets more and more detail:
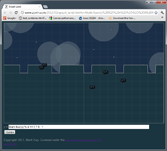
The terrain in my flight simulator works the same way except that I use
random noise instead of sine waves for the basic input, so instead of combining
many layers of sine waves, it is combining many layers of random noise.
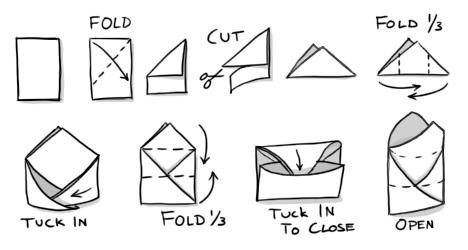
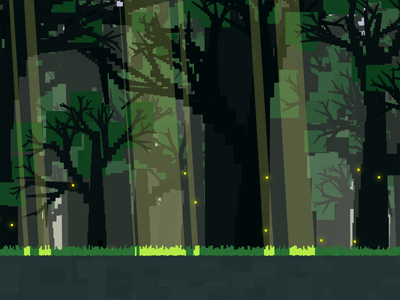
I like collecting seeds from plants in my garden. I store them in little folded paper packets, with the name of the plant and the date collected written on the outside. There are lots of ways to make envelopes out of paper, but this one is my favorite because it is so simple:
I wrote earlier
about Forest, a meditation game I made for the Super Friendship Club's Mysticism
Pageant (you can play it here). That article covered my motivations and inspirations, but
not the details of how it was put together. This article covers the details.
Overview
The game uses HTML5, specifically the <canvas> tag for graphics and the
<audio> tag for music. The world is procedural, which means that
instead of using photoshop to paint the levels by hand I made some algorithms to
generate the world. This has two advantages:
- It is a very fast way to get a lot of variety, which helps the world look
natural and convincing.
- It was more fun. I didn't have to sit down and paint 20 or 30 different
trees by hand.
I worked on this in the evenings and on weekends for about three weeks during
the pageant, and then spent a couple more weeks cleaning things up and polishing
it after. It is about 1500 lines of JavaScript.
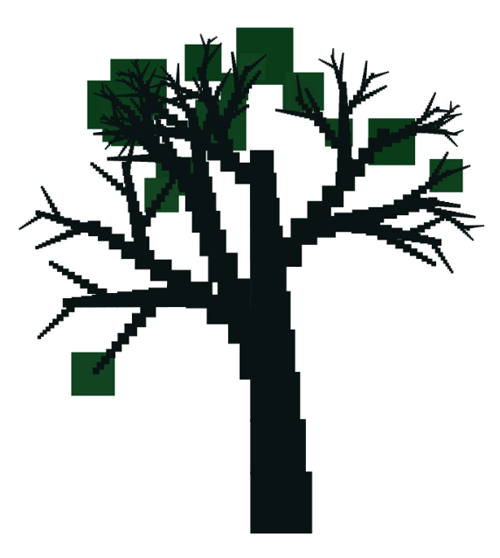
Procedural Trees
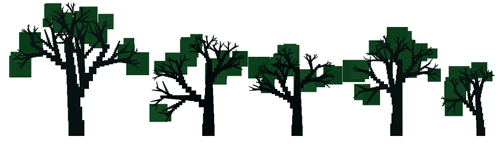
I had the good fortune to be able to work on the code for generating the
trees while sitting on the porch of a cabin near Lake Tahoe. It was quite
relaxing, reclining in the shade of towering pine trees while making a virtual
forest.
The normal way of doing procedural trees appears to be L-systems, but that
seemed too complicated. I did something simpler:
- Trees are made up of blocks of varying sizes and colors.
- Blocks are laid out in straight lines to make branches, with blocks
getting smaller along the branch.
- Starting from the main branch (the trunk), side branches split off
recursively.
- Lengths and angles are randomly jittered, so some branches are longer,
some are shorter, they branch off at slightly different angles, etc.
- At the end of some branches a foliage block is added in a somewhat-random
shade of green.
Procedural Grass and Dirt
Grass has somewhat random heights and colors:
// Returns a css color string like "rgb(30,40,50)"
function rgb(r,g,b) {
  var f = Math.floor;
  return "rgb(" + f(r) + "," + f(g) + "," + f(b) + ")";
}

var width = 3;
for (var x = 0; x < SCREEN_WIDTH; x += width) {
  // Draw one blade of grass
  var shade = Math.random() * 5;
  context.fillStyle = rgb(40 + shade, 110 + shade, 50 + shade);
  var depth = Math.random() * 2;
  var height = depth + 10 + Math.random() * 10;
  context.fillRect(x, SCREEN_HEIGHT - GROUND_HEIGHT + depth, width, -height);
}
(I didn't bother including it in the sample code, but there's also a little
logic to adjust the color if the grass is in a sunbeam)
The dirt has randomly-sized dark and light rectangles layered on it:

// Ground
context.fillStyle = "rgb(35, 50, 50)";
context.fillRect(0, SCREEN_HEIGHT, SCREEN_WIDTH, -GROUND_HEIGHT);

// Dark spots
context.fillStyle = "rgb(32, 47, 47)";
for (var i = 0; i < 20; i++) {
  context.fillRect(Math.random() * SCREEN_WIDTH,
    SCREEN_HEIGHT - Math.random() * GROUND_HEIGHT,
    Math.random() * 50 + 10,
    Math.random() * 50 + 10);
}

// Light spots
context.fillStyle = "rgb(38, 53, 53)";
for (var i = 0; i < 20; i++) {
  context.fillRect(Math.random() * SCREEN_WIDTH,
    SCREEN_HEIGHT - Math.random() * GROUND_HEIGHT,
    Math.random() * 50 + 10,
    Math.random() * 50 + 10);
}
Canvas optimizations
I started out just drawing the entire canvas from scratch in every frame,
using fillRect() calls for almost everything (remember, the grass, dirt, trees,
and player are all made out of blocks). Performance was terrible.
I did some testing and found that at 30 FPS I could only
expect to get 5000 100x100 pixel fillRect() calls. That's not nearly enough.
Each tree is built from about 1000 blocks so that would only get me five trees.
Worse, <canvas> appears to be fillRate() limited. If I want to fill the whole
800x600 canvas, I only get 500 fillRect() calls.
Since the trees don't change, I looked into pre-rendering them to off-screen
canvas elements, then using drawImage() to copy them into the main canvas.
Performance testing suggested that at 30 FPS I could get about 35 800x600
drawImage() calls. This is more than enough, since I only need 3 layers of
trees to give enough depth.
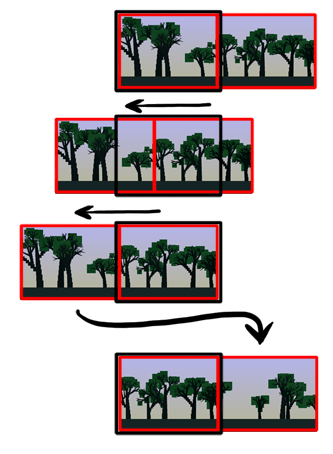
For scrolling, there are two canvases for each layer. When one of the
canvases scrolls off the left side of the main canvas, it is redrawn and starts
scrolling in from the right side of the main canvas. This means in total, there
are only 8 drawImage() calls per frame (three tree layers plus one ground layer,
two canvases per layer).
Colors
I tried different color palettes:
- Warm tones with plenty of yellow in the shades of green. This helped
create the warm, lazy summer afternoon feel I wanted.
- Cooler blue tones to help make the yellow fireflies stand out. The
fireflies looked great but the forest felt too cold.
- A day/night cycle slowly changing between bright, warm greens in the daytime and dark,
cool blues at night (there were even stars which came out at night). This
turned out to not be as awesome as I had imagined.
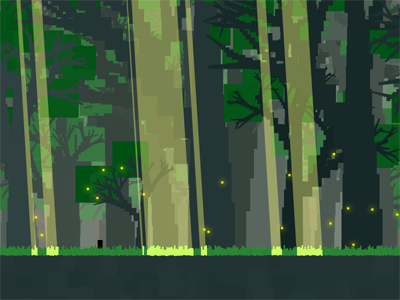
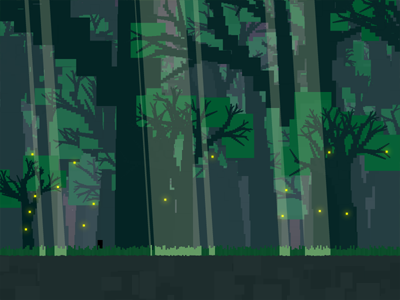
In the end, I compromised and ended with with a somewhat cooler version of
#1:
Text
I browsed through Google's
repository of web fonts until I found Tangerine Bold,
which I think goes very nicely with the theme.
I wanted to use JavaScript to render the text into the canvas directly, but I
couldn't find a way to make it blocky. The obvious solution is to draw the text
at a small size so the pixels are large in relation to the text, then enlarge
the image. However I couldn't stop the browser from doing interpolated scaling,
so the text ended up blurry instead of blocky.
I gave up on JavaScript for this and used Python instead to pre-render the
text into images. I also added a slight drop-shadow to help the text stand out
from the background. Using images instead of rendering from JavaScript adds
about 300 KB of data to download, but at least it works.

from PIL import Image, ImageDraw, ImageFont, ImageFilter

def colorize(image, textColor, backgroundColor):
  colored = image.convert("RGBA")
  colored.putdata([textColor if value == 0 else backgroundColor
                   for value in image.getdata()])
  return colored

text = "Breathe"
font = ImageFont.truetype('Tangerine_Bold.ttf', 36)

image = Image.new("1", font.getsize(text), '#FFF')
draw = ImageDraw.Draw(image)
draw.text((0, 0), text, font=font)
# Use nearest-neighbor when enlarging to make it blocky
image = image.resize([i*2 for i in image.size], Image.NEAREST)

coloredText = colorize(image, (187, 221, 153), (0, 0, 0, 0))
shadow = colorize(image, (0, 0, 0), (0, 0, 0, 0))
for i in range(3):  # Takes several blurs to get blurry enough
  shadow = shadow.filter(ImageFilter.BLUR)

shadow.paste(coloredText, (0, 0), coloredText)
shadow.save("breathe.png")
Movement
I wanted the movement to have a specific feel:
- Syncing input to breathing gives a slow pace
- Possible to run
- Possible to quickly slow down from a run
When space is held, there's an acceleration which decreases as the player's
speed approaches the target speed. Rapidly clicking space builds up an acceleration boost
which allows running. Finally, drag slows the player down quickly from
high speeds but has little effect at slow speeds.
The acceleration from tapping space once is so small it can barely be
noticed. This gives a bad experience if the player just taps space once at the
start of the game because it looks like nothing happened. To fix this, if the player isn't
moving and space is pressed, the speed jumps straight to the target speed. This provides
nice feedback and makes it obvious that pressing space did something.
function Player() {
  this.x = 0; // position
  this.dx = 0; // speed
  this.ax = 0; // acceleration
  this.clicks = 0;  // Number of times player pressed button within clickWindow
  this.clickWindow = 5; // Number of seconds to measure button presses over
  this.running = false; // True if player is holding down button
  this.targetSpeed = 50; // Desired speed if button is held continuously
}

// dt is how much time has elapsed since the last call to update()
Player.prototype.update = function(dt) {
  // calculate bonus acceleration for clicking button rapidly
  this.clicks = Math.max(0, this.clicks);
  var clickRate = this.clicks/this.clickWindow;
  var boost = 49 * clickRate * clickRate;

  var drag = .003 * this.dx * this.dx;
  this.ax = boost - drag;

  if (this.running) {
    // When running, provide an alternate, possibly higher, acceleration
    this.ax = Math.max(this.ax, boost + this.targetSpeed - this.dx);
  }

  this.dx += this.ax * dt;
  this.x += this.dx * dt;
}

Player.prototype.startRunning = function() {
  if (this.running) {
    return;
  }
  this.running = true;
  if (this.dx == 0) {
    // not moving yet, provide a "kick" so it is obvious something happened.
    this.dx = this.targetSpeed;
  }
  this.clicks++;
  var that = this;
  setTimeout(function() {that.clicks--;}, this.clickWindow*1000);
}

Player.prototype.stopRunning = function() {
  this.running = false;
}

var player = new Player();
var SPACE = 32;
$(document).keydown(function(e) {e.which == SPACE && player.startRunning();});
$(document).keyup(function(e) {e.which == SPACE && player.stopRunning();});
// Prevent space from scrolling the page
$(document).keypress(function(e) {return e.which != SPACE});
Metrics
Google Analytics can do event tracking, which is perfect for gathering metrics on how many players
start the game and how many players make it all the way to the end.
function trackEvent(action) {
  if (_gaq) {
    _gaq.push(["_trackEvent", "forest", action]);
  } else {
    console.log("Analytics not loaded. Not logging event: " + action);
  }
}
Even though the game only lasts five minutes, the metrics made it obvious
that players were leaving before finishing. Based on this, I added the "Breathe"
and "Relax" reminders in the middle to hint that the game doesn't just run on
forever. Metrics showed an improvement in the number of players reaching the end
after this change.