Getting Started with AVR Microcontrollers
Trying to get started with AVR microcontrollers, but bewildered by the sheer number of options? So was I, a short time ago. It took several weeks of reading before I felt like I understood how everything fit together. I’ll write it down and hopefully save you a couple of weeks.
(A short aside: if the rest of the post makes it clear that AVRs are too much for you, consider getting an Arduino. They have an AVR chip in them, but are easier to use.)
First, let’s look at what a complete setup looks like:
- AVR chip
- The rest of the circuit
- Hardware programmer
- Software to run the programmer
- Compiler toolchain for your language of choice (assembler or C)
AVR Chip
There’s a huge spectrum of options in the different AVR chips. Don’t worry though, they are all fairly compatible in terms of learning how to program them. They differ in how much memory they have, how many fancy peripherals (like ADCs, UARTs, PWM generators) they contain, what package they come in, and of course how much they cost. You just need to pick the chip that has the right combination of features for your application. If you just want to play around, I’d suggest getting one of the fancier AVR chips, like an ATmega168. Then you’ll have plenty of features for whatever you want to try.
Atmel has a nice product grid that lets you quickly compare the different chips.
If you really need a specific feature for your project, be sure to double-check the datasheet and make sure there isn’t some little gotcha waiting there. Lots of features share pins or internal hardware, or have unexpected restrictions, so you need to understand the datasheet. For example, the timer and PWM generator may share the same counter internally, or one of the output pins might be shared with a pin used by the programmer.
Here’s a suggestion for saving a lot of time: Start with an over-powered chip. Sure, those 8-pin chips are cute, but they don’t have very many peripherals or memory. When you realize you need a 2nd UART which you don’t have, or that you really need 256K more memory, you’ll be sad. Instead, start with one of the fancier chips and use the extra hardware to get your project done sooner. Then, if you still want it to run on a smaller/cheaper chip, you can start optimizing your software and writing bit-banging routines to replace the peripherals.
ISP Header
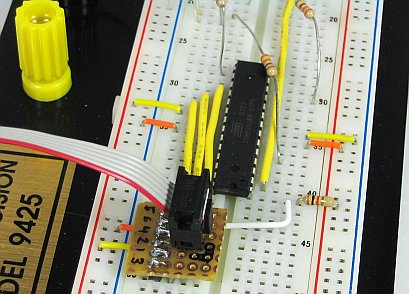
The only AVR-specific part of your circuit is an ISP programming header. This is where you plug in the programmer to download your software onto the AVR chip. It is really easy to build a small ISP adapter that plugs into your breadboard. I explained how I built one here. I suppose you could also just jam wires into your breadboard, but that would be messy.
You’ll want a solderless breadboard to prototype your circuit in (later, once it is perfect, you can move it to perfboard or a PCB, but until the circuit it perfect you’ll be changing it a lot so you want to start on the breadboard). You need some kind of power supply. I built one of these on the corner of my breadboard. You could also use batteries, or the +5 line from a USB connection.
Programmer (Hardware)
This piece of hardware is how you get your programs onto the AVR chip. There are a lot of options, but many of them are outdated. What you want is a USB programmer that does In-System Programming (ISP). Examples:
Whatever one you get, you need to be sure that it will work with your programming software.
Programming software
You need software to control the programmer (confusingly, this software is also occasionally called a programmer). There are a bunch of different pieces of software to do this but the most common 2 seem to be AVR Studio and avrdude. Both are free. Avrdude supports a ridiculous number of different programmers, but you probably want to double-check and make sure the one you are about to buy is supported.
Compiler toolchain for your language of choice (assembler or C)
You can program the AVR in either assembler or C. Since we want to pick the easy road, that narrows it down to C. As far as I can tell, all the different IDEs and tools end up using avr-gcc under the covers. So, you need to get the avr-gcc toolchain:
- Windows: WinAVR
- OSX: OSX-AVR
- Linux: For Ubuntu, you can get slightly outdated versions from apt: apt-get install binutils-avr gcc-avr avr-libc
Where to Go From Here
Ok, you’ve collected all your hardware & software. Now you need to put it all together. Fortunately, there’s already a lot of great information out there on how to get started with blinking some LEDs. Here are some links to get you going:

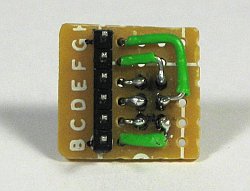 You just need a small piece of perfboard, a 2×3 pin header block, a 6-pin header row, and a little bit of wire. I found it was easier to route the wires if I didn’t bother trying to get the output pins to be sequential. Solder it together and you can leave it in your breadboard, ready for whenever you need to reprogram your microcontroller.