Humble Beginnings: Your First OGRE Application (for linux)

September 23, 2004

Nicholas Green’s Humble Beginnings tutorial for the Ogre graphics engine says “Under construction” for the Linux section. This is an attempt to remedy that. I’m only going to cover setting up the project and getting to a basic program which compiles and runs, similar to the Mac OSX section. After that, you’re on your own…

To begin, make the Samples/Space directory for your project and copy these files into it:

  • Samples/SkyPlane/src/SkyPlane.cpp
  • Samples/SkyPlane/include/SkyPlane.h
  • Samples/Common/include/ExampleApplication.h
  • Samples/Common/include/ExampleFrameListener.h

Next we will set up a basic build system, for which we are going to use GNU automake and autoconf. If you want to learn more about these tools, I suggest reading the excellent tutorial at the autotools website. First we will write Samples/Space/configure.ac, which tells autoconf which programs and libraries we are going to use to compile our application:

AC_INIT([Ogre Space Tutorial],
        [0.0.1],
        [Mark Ivey zovirl@zovirl.com],
        [Space])
AM_CONFIG_HEADER(config.h)
AM_INIT_AUTOMAKE([dist-bzip2])

AC_PROG_CC
AC_PROG_CXX
AC_PROG_LIBTOOL

PKG_CHECK_MODULES(OGRE, OGRE >= 0.14.1,,AC_MSG_ERROR("OGRE not found!"))
AM_CXXFLAGS="$AM_CXXFLAGS $OGRE_CFLAGS"
AM_LDFLAGS="$AM_LDFLAGS $OGRE_LIBS"

AC_SUBST(AM_CXXFLAGS, "$AM_CXXFLAGS")
AC_SUBST(AM_LDFLAGS, "$AM_LDFLAGS")
AC_SUBST(PKGDATADIR, "${datadir}/${PACKAGE}")

AC_CONFIG_FILES([
   Makefile
])

AC_OUTPUT

Most of that is boiler-plate. The two important parts are “PKG_CHECK_MODULES(OGRE…)” which tells autoconf we will be using OGRE (and it should go find the correct compiler flags for us) library and “AC_CONFIG_FILES(…)” which tells autoconf which files we want it to generate.

Next we will write Samples/Space/Makefile.am, which tells automake how to compile our program:

bin_PROGRAMS = Space

noinst_HEADERs= ExampleApplication.h \
                ExampleFrameListener.h \
                SkyPlane.h

Space_SOURCES= SkyPlane.cpp

EXTRA_DIST = bootstrap configure

Ok, the last part of the build system is a short script to set everything up for us, Samples/Space/bootstrap:

#!/bin/sh

set -x
rm -f config.cache &&
libtoolize --force &&
aclocal &&
autoconf &&
autoheader &&
automake --foreign --add-missing

make that executable with “chmod +x bootstrap”

You are ready to compile (from the Samples/Space/ directory):

./bootstrap
./configure
make

Finally, you should be able to go into the data directory (Samples/Common/bin) and run ../../Space/Space.

Ok, the build system is done, now it is time to add the real source code. Remove SkyPlane.cpp and SkyPlane.h and edit Makefile.am to reflect the new files you are about to add:

bin_PROGRAMS = Space

noinst_HEADERs= ExampleApplication.h \
                ExampleFrameListener.h \
                SpaceApplication.h

Space_SOURCES= SpaceApplication.cpp

EXTRA_DIST = bootstrap configure

Finally, add the code for the application’s main loop in SpaceApplication.cpp:

#include "Ogre.h"
#include "SpaceApplication.h"

int main(int argc, char *argv[])
{
   // Create application object
   SpaceApplication  app;
   try {
      app.go();
   } catch( Ogre::Exception& e ) {

   std::cerr << "An exception has occured: " <<
   	e.getFullDescription().c_str() << std::endl;
   }

   return 0;
}

That won’t compile just yet because SpaceApplication.h hasn’t been added, but you are ready to continue on with the rest of the tutorial. Enjoy…


Tags:

Permalink

August 7, 2004

This plugin helps you use a consistent permanent link format by generating permanent links for you. It does this by exporting two variables, $permalink::story and $permalink::category, which contain the permanent link for the current story and category, respectively. It also provides a function permalink::get_link() which can be used by other plugins when they wish to get a permanent link for a file.

I also have some patches for blosxom.cgi and some other plugins that make them use permalink:

Download permalink 0.0.1

Documentation is available here.


Tags:

Permalink 0.0.2

August 7, 2004

I updated permalink to work with metadate 0.0.3. This lets the absolute plugin look up permalinks outside the current directory.

Download permalink 0.0.2

Documentation is available here.


Tags:

Metadate 0.0.3

August 7, 2004

I updated metadate to parse metadates contained in stories. I had to do this because entries_cache wasn’t providing metadates for stories outside the current directory, but the permalink plugin needs those.

Download metadate 0.0.3 Be sure to rename it to “metadate”

Documentation is available here.


Tags:

Dotcat 0.3

June 19, 2004

Here is dotcat version 0.3. Changes from the previous version include:

  • Now can handle multiple input files
  • a new –disable-pruning option in case you want to not combine duplicate nodes & edges
  • documentation in POD (use ‘perldoc dotcat’)

Download dotcat 0.3


marbles 0.6

May 31, 2004

Just for fun in the evenings, my wife and I have been working on a simple marbles solitaire game. Yeah, we know, there are already hundreds of versions of this game. That isn’t the point. It is a way for us to learn SDL and keep our programming skills sharp. It isn’t finished yet so there are some rough edges, but we are posting it anyway. In the game, just click to move pieces around. ‘q’ quits and ‘r’ resets the board.

Download source code
win32 binaries


Tags:

Mountain Biking over Oat Hill Mine road

April 8, 2004

Bikes (small)

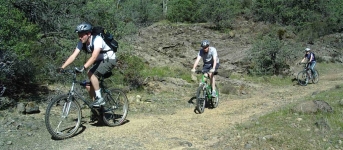
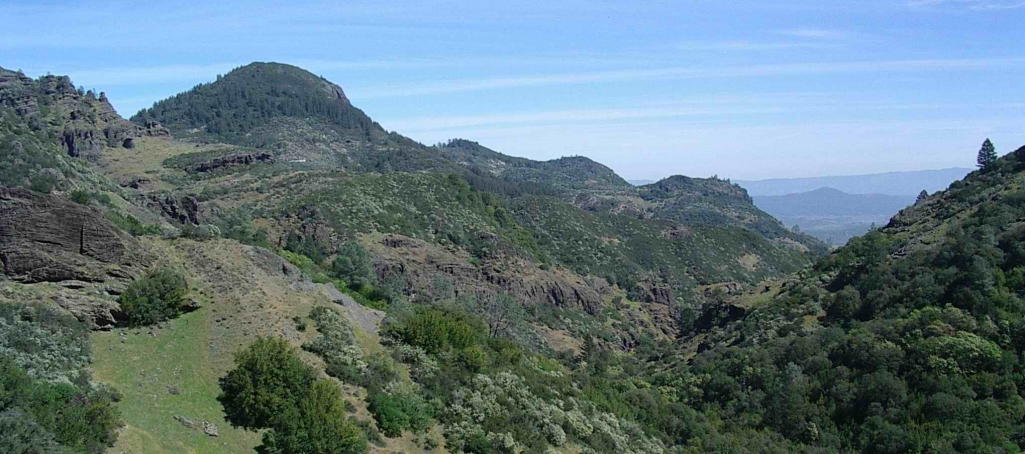
3 weeks ago my wife, brother, and I got the opportunity to mountain bike from Aetna Springs to Calistoga. This ride starts on private property but my parents obtained permission to cross through a friend of the owner.

cliffs_small.jpg
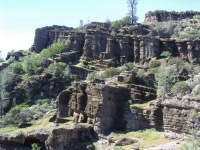
The route follows an old wagon road which goes over the mountains between Aetna Springs and Calistoga. The road used to be used to reach the numerous mines in the area, and in some parts you can still see the ruts worn into the rock by the wagon wheels. We started a few miles past the old Aetna Springs resort, at a gate where a sign proclaimed “End of county maintained road.” From there the road goes up, skirting along the edge of a hill. The road was fairly rough on the way up and we ended up walking quite a lot of it. My parents, who were hiking, were able to keep up with us on this section of the road. The terrain in this area is very desolate and filled with odd looking volcanic rock outcroppings.

After the first main climb the road crosses a small valley before dropping down to Maple spring. Right before the road starts down there was was a small cave next to the road. The tracks from 4-wheel drive vehicles, which we had seen from the start of the ride, stopped at the cave. After that, the trail was considerably more brushy, and in most areas it was reduced from a road to a single track. In a few places we walked just to avoid touching the poison oak infringing on the trail.

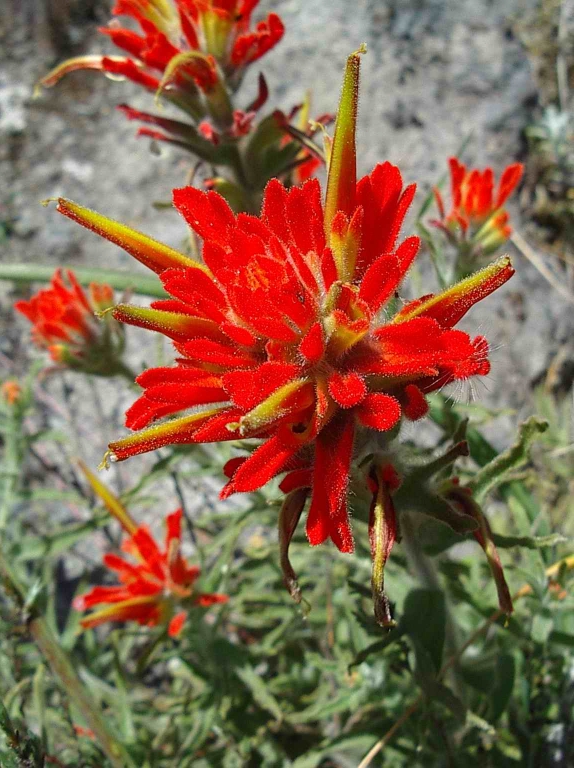
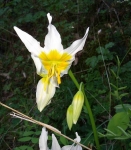
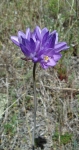
Maple spring didn’t have very much water, but it would have been enough to drink if we had been thirsty (it might have been hard to get to the water through the brush, however). From here the trail climbed up until it met the hiking trails in the Palisades area near Calistoga. There were some great wildflowers along the trail, although often the trail was technical enough that we had to stop riding if we wanted a chance to look at the flowers.

flower1_small.jpg flower2_small.jpg flower3_small.jpg
Once we met the Palisades trail, it was all downhill. The first section down is all rocks and was some of the most technical riding I have ever done. I think I walked at least half of it, and almost went over the handlebars twice. I definitely would have felt better with some body armor here. After leaving the technical rocks the trail is much nicer. There were still the occasional rocks in the trail, but after the section at the top we were ready to take them on.

hills_small.jpg
This was a great ride. We probably won’t ever have the opportunity to do it again (owing to the private property at the start) but I’m glad we were able to do it once. It isn’t something I would want to do every day, however. By the time we got down our hands were aching from braking and hanging on over the bumps.


dotcat 0.1

April 6, 2004

I’ve been working on a utility to combine dot files before they are run through graphviz. My goal is to combine the per-class inheritance diagrams which doxygen generates into a single large diagram that shows inheritance for all the classes in a project (of course, it should be useful for combining other graphs). I don’t have everything just the way I want it, but it is working now so I figured I would post it.

Currently it only combines two dot files at a time. You use it like this:

dotcat in1.dot in2.dot out.dot

In the future I would like to add the ability to combine multiple dot files, along with better control over how they get combined (right now it doesn’t always keep the URL attributes of nodes, for example)

Download dotcat 0.1


Fullcategory 0.0.2

March 16, 2004

Well, the last version of fullcategory had a bug which broke permalinks. Yes, this plugin was supposed to fix a bug but instead contained a bug…haha. Thanks to Gary Gale for finding the problem. Anyway, here is the new version.

Download fullcategory 0.0.2

Documentation is available here.


Tags:

Fullcategory

February 19, 2004

By default, blosxom will return results for partial category name matches. For example, if “telephone” is a category, these would all return posts about telephones:

  • http://example.com/telephone
  • http://example.com/telepho
  • http://example.com/tele

(If “television” was also a category, that last example would include posts from both the television & telephone categories)

This behavior gets in the way of Fletcher’s emptymessage plugin, so I wrote the fullcatgory plugin. Fullcategory changes Blosxom so only full category names will give results. This lets the emptymessage plugin do its thing. I’m pretty sure that with both emptymessage and fullcategory installed, I will be able to run an automatic link checker over my site and find dead (404) links, where before some links went to empty blosxom pages.

Download fullcategory 0.0.1

Documentation is available here.


Tags:

How to Set Up the Wake-On-Lan Proxy On Bering firewalls

February 18, 2004

Want to remotely access computers behind your Bering firewall, but they aren’t turned on? You need the Wake-On-Lan Proxy written by Ken Yap.

Wake-On-Lan (WOL) is a technology that lets you turn on a computer on your network by sending a special packet to it over the network. The WOL proxy makes it easy to send these packets to your network from anywhere on the Internet, securely. It consists of a server (wold) and a client (wolc.pl). When the client sends the right password to the server, the server sends a WOL packet to the target computer.

If you want to set this up on your Bering firewall, first get WOL working. It is hard to debug, so it is best to get this out of the way before you add the proxy into the mix.

  1. Load the etherw package onto your firewall. This lets you send WOL packets when you are logged into the firewall.
  2. Make sure the target computer supports WOL and has it enabled in the BIOS
  3. The OS on the target machine has to leave the network card in a WOL-ready state when it shuts down. Instructions for linux and windows. Here is how I set up my Shuttle SK41G for WOL
  4. Turn off the target machine and send a WOL packet from the firewall:
    ether-wake 00:AA:BB:CC:DD:EE -i eth1
    

    The target machine should turn on

Once you have basic WOL working, it is time to set up the proxy:

  1. Load the wold.lrp package onto the firewall
  2. Go into “lrcfg”–>”packages”–>”wold” to edit the configuration file (/etc/wold.conf). Add the target machine’s MAC address, name, and password. You will need the same configuration file for the client
  3. Add wold to the list of services (/etc/services) and give it a port number:
    ...
    # Local services
    wold 54321/tcp  # WOL proxy
    wold 54321/udp # WOL proxy
    ...
    
  4. Configure inetd.conf to run wold when the client connects.
    ...
    wold stream tcp nowait sh-httpd /usr/sbin/tcpd /usr/sbin/wold \
       -f /etc/wold.conf -i 192.168.1.255 -p 54321
    ...
    

    Restart inetd (run svi inetd resart).

  5. Configure hosts.allow to allow machines to connect to the firewall
    ...
    wold: ALL
    ...
    
  6. Edit the shorewall rules file to allow incoming wold connections from the local network and the internet, and to allow outgoing WOL packets to the local network.
    ...
    # Allow WOLD requests to the firewall from anywhere,
    # Allow WOLD magic packets from the firewall to local
    ACCEPT loc fw tcp 54321
    ACCEPT net fw tcp 54321
    ACCEPT fw loc udp 54321
    ...
    

    Restart shorewall (run svi shorewall resart)

  7. Back up all the Bering packages you changed (wold, shorewall, etc)
  8. Grab the client (it is in the WOL proxy package, found here) and set it up with the same configuration file you used on the server (you can remove passwords if you want to be prompted). Run it like this:
    $ ./wolc.pl -f wold.conf 192.168.1.254:54321 computer_name
    

Wake-On-Lan Proxy for Bering Firewalls, 0.5

February 18, 2004

This is the Wake-On-Lan Proxy 0.5 written by Ken Yap, packaged for Bering firewalls. Only the daemon is included in the .lrp package, since that is the part that needs to run on the firewall.

Download wold.lrp version 0.5

I also wrote a short explanation of how to set this up here.


Getting Wake-On-Lan to work with a Shuttle SK41G and Mandrake Linux 9.1

February 18, 2004

My main computer is a Shuttle SK41G. It is a great computer… elegant, powerful, and small. I have windows installed for games (the SK41G is great for LAN parties), but I use Mandrake Linux most of the time. To get Wake-On-Lan(WOL) working with it, I had to do two things:

  1. Enable WOL in the BIOS. The options for this are in “Power Management Setup”–>”IRQ/Event Activity Detect”. There are two options: “PowerOn by PCI Card” and “Modem Ring Resume”. I’m not sure why, but either option enables WOL when the computer has just been plugged into power, but “PowerOn by PCI Card” is the only one I could get to enable WOL when linux shuts down the computer. (WOL is strange that way…)
  2. Configure linux so WOL is enabled when the computer shuts down. This WOL FAQ suggests adding a post-install line to /etc/modules.conf to run ethtool, but that didn’t work on my system. Instead I put this in /etc/rc.d/rc.local:
    ethtool -s eth0 wol ubmg
    

Tags:

How to configure Bering offline

February 18, 2004

The Bering installation instructions explain how to configure Bering on the firewall machine itself, by using the lrcfg program and backing up the files to the floppy disks. Sometimes I find it more convenient to edit configuration files on my desktop computer, and then copy the new image to floppy disk. (I have a linux desktop, by the way. I’m not sure how to do this on windows)

Here’s how I do it:

  1. Mount the disk image as a loopback filesystem:
    $ mkdir mount_directory
    $ mount -o loop -o umask=000 diskimage.bin mount_directory
    
  2. Some files, like syslinux.cfg, can be edited directly
  3. lrp packages need to be uncompressed before they can be edited. This has to happen in a temporary directory outside the mounted disk image, since there won’t be enough room inside the mount directory:
    $ mkdir package_directory
    $ cd package_directory
    $ tar -zxvf ../mount_directory/package.lrp
    
  4. After editing files in the package, re-compress it and replace the original lrp file:
    $ tar -cvf package.tar *
    $ gzip -9 package.tar $ cp package.tar.gz ../mount_directory/package.lrp
    
  5. Finally, unmount the image:
    $ umount mount_directory
    

If you want to test your images before unmounting them, call sync first to make sure the images are up to date.


How to set up dhcp_2_dns.sh

February 17, 2004

dhcp_2_dns.sh is a script which updates tinydns with addresses handed out by dhcpd. This is useful for Bering firewalls because DNS and DHCP will be synchronized.

Here’s how to set it up:

  1. First, make sure tinydns is set up and running (directions are here).
  2. Copy dhcp_2_dns.sh onto your firewall. I put my copy in /usr/bin/. Add /usr/bin/dhcp_2_dns.sh to /var/lib/lrpkg/tinydns.list:
    ...
    usr/bin/tinydns-data
    usr/bin/dhcp_2_dns.sh
    etc/tinydns-private/
    ...
    

    (This adds dhcp_2_dns.sh to the tinydns.lrp package).

  3. Edit /etc/init.d/tinydns so that dhcp_2_dns.sh is run every time tinydns starts. Add the call near the end of set_dnscache():
    ...
        echo "" > /var/run/resetdns.pid
        /usr/bin/dhcp_2_dns.sh      # run dhcp_2_dns.sh
        RESET_DNS=Y
    }
    ...
    
  4. Back up tinydns.lrp
  5. Edit /etc/multicron-p and add dhcp_2_dns.sh to periodic():
    periodic () {
        checkfreespace
        pingcheck
        /usr/bin/dhcp_2_dns.sh
    }
    

    By default, periodic() is run every 15 minutes. This can be changed in /etc/cron.d/multicron.

  6. Back up etc.lrp

dhcp_2_dns.sh 0.2

February 17, 2004

This is an update to Michael D. Schleif’s dhcp_2_dns.sh script, which updates tinydns with addresses handed out by dhcpd. This includes the following changes from version 0.1:

  • Fixed “out of range” problem when comparing lease dates
  • Fixed problem where DNS entries were never replaced when a host’s address
    changed
  • New feature: fixed-address entries (from dhcpd.conf) are now added to the
    DNS server

Download dhcp_2_dns.sh 0.2

I also have some simple directions for setting this up on a Bering firewall


Metadate 0.0.2

January 23, 2004

A new version of metadate is available. This version changes the paths in the external metadate file. They used to be the full path of the file, now they are the path starting from $blosxom::datadir. This should make it easier to relocate the $blosxom::datadir (or have a blosxom installation on your desktop machine for testing)

Download metadate 0.0.2 Be sure to rename it to “metadate”

Documentation is available here.


Tags:

Metadate 0.0.1

January 23, 2004

This plugin lets you put metadates in an external file. This is especially useful when you want to specify metadates for files which can’t contain metadates themselves, such as directories, images, binary files, etc..

Download metadate 0.0.1 Be sure to rename it to “metadate”

Documentation is available here.


Tags:

Snowshoe Repair Kit

January 18, 2004

If you go snowshoeing, it might be a good idea to take a simple repair kit with you. We went cross country skiing to Fallen Leaf Lake today with my parents, who were on snowshoes. When we turned around to go back to the car we noticed one of the rivets was missing from my Dad’s snowshoe. My parents have had a few rivets pop out of their snowshoes in the past, so they were prepared when it happened again today:

Repair Kit

  • A few washers
  • A few small screws
  • A few nuts
  • A small pair of pliers
  • A small screwdriver

These made the repairs simple and fast.


Tags:

Papercraft

January 16, 2004

Here’s something to do while you watch TV: build paper models. Called “card modeling” or “papercraft”, it’s inexpensive and doesn’t take up as much room as regular plastic models. There are hundreds of free designs on the internet, and hundreds (thousands?) more you can buy for a few dollars each.

All you really need is a design, a printer, some heavy paper (card stock works well, look in office supply stores), a sharp knife, and some white glue. The best resource site I have found is cardfaq.org. They give much more detailed information on how to build the models than I ever could, plus they have a huge list of links to free designs.

Just to give you an idea of what kind of models you can find, here are a few links:


Tags:

URIs Moving documents

January 16, 2004

I came across one of the first tests of my new URI format today. I wanted to post an update to the timezone plugin, but I wanted to keep the previous version around. Hmmm…multiple stories on the same topic? That sounds like a job for a category. Sadly, the obvious category for this (/software/blosxom/plugins/timezone) was already taken by my previous version, which was sitting on these URIs:

  • /2003/software/blosxom/plugins/timezone: the perl plugin
  • /2003/software/blosxom/plugins/timezone_about: the blosxom article about the plugin
  • /2003/software/blosxom/plugins/timezone_pod.html: documentation for the plugin

I’m not using the full date in my URI, so I only get to reuse a path once a year. Fortunately I got lucky because we just entered a new year. That means /2004/software/blosxom/plugins/timezone is available for me to use. Here are the new URIs I laid out:

  • /2004/software/blosxom/plugins/timezone/: the category (main URI for the timezone plugin)
  • /2004/software/blosxom/plugins/timezone/about_0_0_2: the blosxom article about version 0.0.2
  • /2004/software/blosxom/plugins/timezone/about_0_0_3: the blosxom article about version 0.0.3
  • /2004/software/blosxom/plugins/timezone/pod_0_0_2: the documentation for version 0.0.2
  • /2004/software/blosxom/plugins/timezone/pod_0_0_3: the documentation for version 0.0.3
  • /2004/software/blosxom/plugins/timezone/timezone_0_0_2: version 0.0.2 of the plugin
  • /2004/software/blosxom/plugins/timezone/timezone_0_0_3: version 0.0.3 of the plugin

So, I moved the old files to the new locations, added the new files, and updated my metadates so they were all correct. I then updated my .htaccess to add 301 redirects for the old URIs:

...
Redirect permanent /2003/software/blosxom/plugins/timezone_about \
   http://zovirl.com/2004/software/blosxom/plugins/timezone/
RedirectMatch permanent /2003/software/blosxom/plugins/timezone_about\.(.*) \
   http://zovirl.com/2004/software/blosxom/plugins/timezone/index.$1
Redirect permanent /2003/software/blosxom/plugins/timezone \
   http://zovirl.com/2004/software/blosxom/plugins/timezone/timezone_0_0_2
Redirect permanent /2003/software/blosxom/plugins/timezone_pod.html \
   http://zovirl.com/2004/software/blosxom/plugins/timezone/pod_0_0_2.html
...

Finally I posted the new version. Overall it was a fairly simple task. I got lucky with the new year, in the future I’ll have to be more careful when I post stories I know will turn into categories in the future.

Update: Found one more gotcha: my internal links are generated using the absolute plugin. When I move files, old references to them need to be updated in my blosxom stories, otherwise absolute can’t find the files and doesn’t generate the right links.

Update 2: It really makes more sense to set the directories up like this:

http://zovirl.com/2004/software/blosxom/plugins/fullcategory/v0_0_1/about.blosxom
http://zovirl.com/2004/software/blosxom/plugins/fullcategory/v0_0_1/fullcategory
http://zovirl.com/2004/software/blosxom/plugins/fullcategory/v0_0_2/
...

Tags:

High Performance Paper Airplanes: G-1

January 16, 2004

G1 Small

I’ve played around with laminated paper airplanes some and now that I have a webpage I can finally post some of my designs for download. This is a pretty cheap hobby. The plans are free and you just cut them out and glue them together. The only thing most people won’t already have around the house is heavy paper.

This isn’t the kind of airplane we all used to fold in school. It is made from heavy cardstock, using many laminated layers for strength. Properly adjusted and thrown it can fly a long ways. I would suggest going to a large open space, like a park, to test it out. When I flew it from my driveway I ended up retrieving it from my neighbor’s yards most of the time.

Materials you will need:

  • Heavy card stock. This is a thick paper, like 3×5 index cards. You can buy it at office supply stores.
  • Scissors
  • Glue. Plain white glue works well. I apply it using a small paintbrush.
  • Something to score the paper with before folding. A ball-point pen will work, but will leave marks. I use the tip of the nailfile on my pocketknife. To score the paper carefully run your scoring tool along the fold line while pushing down. This will push a line into the paper and help it fold where you want. Use a ruler to get straight lines.
  • A heavy stack of books to put the pieces under as the glue sets. Put a sheet of paper above and below the pieces you are gluing so excess glue doesn’t get on the books

Download G-1 plans (rev. 2):

Once you have downloaded the plans print them out on heavy paper. Follow the directions to construct the plane. Once the plane is finished let it dry overnight. Then look here to see how to tune and fly your plane.

If you are interested in this sort of thing you might want to check out some of the Whitewings kits. That’s where I got my start from. Their designs are much more elegant than mine, and at least the kit I have came with a very nice booklet containing construction and flying tips.


Airplane Tuneup and Flying

January 16, 2004

It isn’t too hard to fly these laminated paper planes, but here are some tips that can make it work better.

First, look at the plane straight-on from the front, back, and top. Make sure all the pieces are straight and lined up. Bend them gently if they aren’t.

Ok, ready for your first flights. Best to do this on a dry day with no wind. Grip the plane under the wings and throw it straight ahead (not up or down). Ideally it should fly straight ahead in a nice smooth glide.

If it turns left or right look at the plane and try to figure out why. Is one wing warped differently than the other? Is the rudder (the back edge of the vertical part of the tail) straight? If you don’t see anything obvious just bend the rudder a little to the left or right, or bend the trailing edge of one wing down and the other one up.

If the plane pitches up, then drops its nose, then pitches up again, bend the trailing edge of the horizontal part of tail down. If the plane noses down too quickly, bend the trailing edge up. You want the plane to follow a nice smooth glide, almost but not quite pitching up.

For really long flights, you want to adjust the plane so it turns to the left. Then throw it straight up. If everything goes right it should climb almost straight up, then roll out and start a slow spiral back down to the ground.


Timezone 0.0.3

January 13, 2004

Version 0.0.3 is now available. This version adds the ability to use the server’s default timezone and a new variable, $timezone::offset. This gives the offset from GMT (for example, for PST it will be -0800).

Download timezone 0.0.3. Be sure to rename it to “timezone”

Documentation is available here.


Tags:

Timezone 0.0.2

January 13, 2004

This is an update to Raffi Krikorian’s timezone plugin. In addition to the previous functionality (which allows Blosxom timestamps to use a different timezone than the server), the plugin now exports a variable, $timezone::name, so flavors can display the timezone next to times.

For example, this bit of flavor:

$mo_num/$da/$yr $hr:$min $timezone::name

might produce this output:
12/25/2003 11:19 PST

Download timezone 0.0.2. Be sure to rename it to “timezone”

Documentation is available here.


Tags: